

Barcode & QR-Code Scanner in React Native: Easy Peasy
In this blog, we are going to create an app. Which will be able to read QR-Code & Barcode in real-time and render their content to the screen.


Hi Readers👋,
Welcome back to my new blog, I hope you are doing well. To make a Barcode & QR Code app in React Native we are going to use two npm packages, the first one is react-native-camera and the second one is react-native-barcode-mask.
Why React Native Camera?
React Native Camera is a comprehensive camera component in React Native. It gives you control of the camera and communicates with the native OS and device hardware. It is a completely open-source project. It has more than 9k stars on GitHub and more than 98k downloads per week on npm. And the cool thing about React Native Camera is that it is based on the expo-camera module. Therefore, you can also use it with Expo.
It also comes with great Documantation
React Native Camera Supports the following:
- Photographs
- Videos
- Face detection
- Barcode scanning
- Text recognition
Step 1: Initializing project
First, let's get started by creating a new React Native project:
npx react-native init BarcodeScan
Now let's run the Metro Server
cd BarcodeScan
npx react-native start
Open another tab in the terminal, and run your app on emulator or simulator or connected physical device.
npx react-native run-android
after a few minutes, you are now able to see the React Native hello world app on your device.
if you get an error, goes like SDK location not found. Define location with sdk.dir in the local.properties file or with an ANDROID_HOME environment variable then do check this.
Step 2: Adding Dependencies
Now it's time to install dependencies for our app. To install the dependencies open the new tab in the terminal and run the following command to install react-native-camera.
If you are using npm, run this
npm install react-native-camera --save
If you are using yarn, then run this
yarn add react-native-camera
This command will install the react-native-camera into your node_module directory and, --save is an optional command, it is added to update the dependency in the package.json file.
Now, run this command to link the react-native-camera. (RN < 0.60)
npx react-native link react-native-camera
IOS - Other required steps
Run this command to pod install
cd ios && pod install && cd ..
Add permissions with usage descriptions to your app Info.plist
<!-- Required with iOS 10 and higher -->
<key>NSCameraUsageDescription</key>
<string>Your message to user when the camera is accessed for the first time</string>

<!-- Required with iOS 11 and higher: include this only if you are planning to use the camera roll -->
<key>NSPhotoLibraryAddUsageDescription</key>
<string>Your message to user when the photo library is accessed for the first time</string>

<!-- Include this only if you are planning to use the camera roll -->
<key>NSPhotoLibraryUsageDescription</key>
<string>Your message to user when the photo library is accessed for the first time</string>

<!-- Include this only if you are planning to use the microphone for video recording -->
<key>NSMicrophoneUsageDescription</key>
<string>Your message to user when the microphone is accessed for the first time</string>
Android - Other required steps
You must also need to add the camera permissions at android/app/src/main/AndroidManifest.xml:
<!-- Required -->
<uses-permission android:name="android.permission.CAMERA" />

<!-- Include this only if you are planning to use the camera roll -->
<uses-permission android:name="android.permission.READ_EXTERNAL_STORAGE" />
<uses-permission android:name="android.permission.WRITE_EXTERNAL_STORAGE" />

<!-- Include this only if you are planning to use the microphone for video recording -->
<uses-permission android:name="android.permission.RECORD_AUDIO"/>
Insert the following lines in android/app/build.gradle:
android {
  ...
  defaultConfig {
    ...
    missingDimensionStrategy 'react-native-camera', 'general' // <--- insert this line
  }
}
Now, after adding react-native-camera to the dependency, we are now going to our second and last dependency react-native-barcode-mask
If you are using npm, run this
npm install react-native-barcode-mask --save
If you are using yarn, then run this
yarn add react-native-barcode-mask
It's a Barcode and QR Code scan layout for react-native applications with customizable styling.
Step 3: Designing Layout
First, let's remove all the code inside App.js and design the App UI as you wanted to, for this blog I've to design a simple and nice-looking UI. Here it is
import React from 'react';
import {Image, Text, TouchableOpacity, View} from 'react-native';
import BarcodeMask from 'react-native-barcode-mask';
import {RNCamera} from 'react-native-camera';

export default function ScanBarcode() {
  const onCodeRead = event => {
    // Logic after code is read
  };

  const scanAgain = () => {
    // Scan Again Logic
  };

  return (
    <View flex={1} style={styles.container}>
      <View style={styles.nav}>
        <Text style={styles.title}>Scan</Text>
        <TouchableOpacity
          onPress={() => {
            scanAgain();
          }}>
          <Image
            style={styles.icon}
            source={require('./refresh.png')}
            alt="refresh icon"
          />
        </TouchableOpacity>
      </View>
      {/* Scanner */}
      <RNCamera
        defaultTouchToFocus
        flashMode={RNCamera.Constants.FlashMode.auto}
        mirrorImage={false}
        onBarCodeRead={e => {
          onCodeRead(e);
        }}
        androidCameraPermissionOptions={{
          title: 'Permission to use camera',
          message: 'We need your permission to use your camera',
          buttonPositive: 'Ok',
          buttonNegative: 'Cancel',
        }}
        captureAudio={false}
        style={styles.preview}
        type={RNCamera.Constants.Type.back}>
        {/* Code Value */}
        <Text style={styles.codeRead}>1234892923</Text>
        {/* Barcode Mask */}
        <BarcodeMask
          edgeColor="#fff"
          edgeRadius={10}
          backgroundColor="#"
          animatedLineColor="#fff"
          animatedLineHeight={3}
        />
      </RNCamera>
      {/* Scan Code Button */}
      <View style={styles.butn}>
        <Text style={styles.butnTitle}>Scan Code</Text>
      </View>
    </View>
  );
}

const styles = {
  container: {
    flex: 1,
    flexDirection: 'column',
    backgroundColor: '#27205F',
    padding: 20,
    position: 'relative',
  },
  title: {
    width: '60%',
    fontSize: 30,
    fontWeight: 'bold',
    backgroundColor: 'transparent',
    padding: 10,
    color: '#fff',
  },
  icon: {
    width: 40,
    height: 40,
  },
  nav: {
    flex: 0.1,
    width: '100%',
    flexDirection: 'row',
    justifyContent: 'space-between',
    alignItems: 'center',
  },
  butn: {
    width: '100%',
    textAlign: 'center',
    padding: 15,
    backgroundColor: '#4CAFE9',
    borderRadius: 15,

    position: 'absolute',
    bottom: 20,
    left: 20,
  },
  butnTitle: {
    textAlign: 'center',
    fontWeight: 'bold',
    fontSize: 20,
    color: '#fff',
  },
  preview: {
    flex: 0.6,
    justifyContent: 'flex-end',
    alignItems: 'center',
  },
  codeRead: {
    color: '#fff',
    fontSize: 18,

    position: 'absolute',
    top: 20,
  },
};
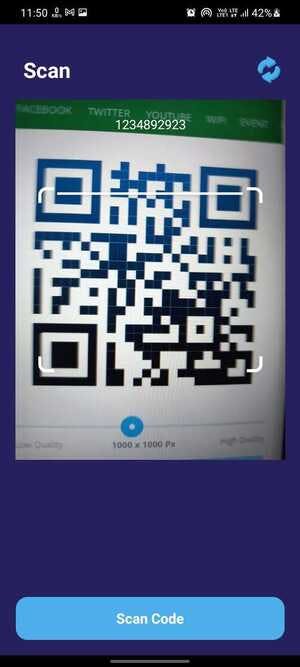
App UI looks like.
Step 4: Adding Functionalities
We can see barcodes but we can't read them yet. Let's use RNCamera to recognize what is written inside every barcode.
Let's create two states to keep tracking of whether RNcamera read the barcode or not if so then store the code in another state.
  const [isBarcodeRead, setIsBarcodeRead] = useState(false);
  const [barcodeValue, setBarcodeValue] = useState('');
Logic after code is being read
  const onCodeRead = event => {
    // Logic after code is read
    if (!isBarcodeRead) {
      setIsBarcodeRead(true);
      setBarcodeValue(event.data);
    }
  };
Read Code again logic
  const scanAgain = () => {
    // Scan Again Logic
    setIsBarcodeRead(false);
    setBarcodeValue('');
  };
Remove harcode text of barcode value and remove it with our state variable ( where we are storing the code value )
<Text style={styles.codeRead}>{barcodeValue}</Text>
Changin button title according to our state
      {!isBarcodeRead ? (
        <TouchableOpacity style={styles.butn}>
          <View>
            <Text style={styles.butnTitle}>Scanning..</Text>
          </View>
        </TouchableOpacity>
      ) : (
        <TouchableOpacity
          style={styles.butn}
          onPress={() => {
            alert(`Code is Read: ${barcodeValue}`);
          }}>
          <View>
            <Text style={styles.butnTitle}>Done</Text>
          </View>
        </TouchableOpacity>
      )}
 Congratulation, our QR Code and Barcode scanner app are completed. If you want the source code, then do check my github. If you have any doubts or you want to share something about the topic you can comment below. There will be more posts coming soon. Stay tuned!
Bye 👋, have a nice day/night.